Tags
Tags are user-defined labels that allow you to categorize events and tasks in BusyCal. You can also use tags to search for specific events within your calendar.
Note: During the initial sync, categories from Exchange are synchronized as tags.
Entering Tags
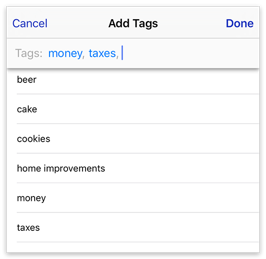
To apply tags to events, tap Add Tags in the Event Details view. Type a tag, tap Return (or select a previously entered tag), and repeat as desired to add more tags. Tap Done.

Note: The Add Tags option is only visible when creating new events or to-dos if you have enabled it in Event Details Settings. If you do not see the Tags option, go to Settings > Event Details and ensure the Show Tags switch is enabled. If the switch is on and you still cannot add tags, it is likely because the remote service does not support tags natively, leading BusyCal to hide the option.
Tag History
BusyCal automatically stores tags as you create them and adds them to your Tag History. Navigate to Settings > Advanced > Manage Tag History, where you can add, delete, rename, and colorize tags.
Note: Deleting or renaming a tag in the Tag History dialog does not affect any events that already have that tag. The tags are only removed from the Tag History. However, changing the color of a tag will affect all events with that tag.
Event Colors
Events and tasks can also be colored using the new Color property added in v5.0. Navigate to Settings > Event Details and activate the Show Colors switch.
The Color property of an event indirectly relates to the Tags property and acts as a shortcut. Assigning a color to an event effectively assigns a Colored Tag to it. BusyCal will link the selected color to the event as a colored tag. Custom colors can also be assigned using hex-codes, such as #FF0000 for red.
NOTE: Event colors from Google Calendar are now directly synced with this new property.
Tag Syncing
Tag history, including the colors assigned to them, automatically syncs across all your devices via iCloud. You can disable this feature under Settings > Advanced > Manage Tag History.