Activity List
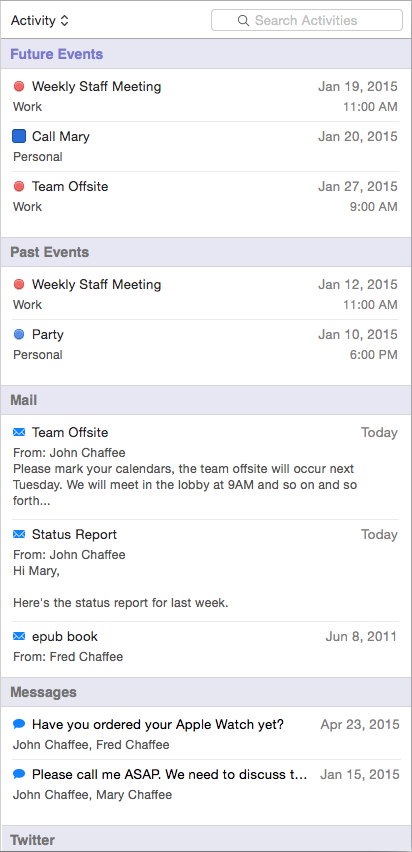
The Activity List shows a chronological listing of activities associated with the selected contact. You can show or hide the Activity List by selecting View > Show/Hide Activity List.
Activities are arranged into the following sections:
- Calendar Events — A list of calendar events in BusyCal that include the selected contact as a meeting participant, or linked contact. Note: BusyCal is required for displaying Calendar Events. See Linking Contacts with Events in BusyCal for more info.
- Mail — LIMITED SUPPORT. A list of messages in Apple Mail to/from the selected contact. NOTE: Apple has disabled support for Mail in macOS 10.15 and above - this is now supported via a Mail Plugin. However Mail Plugins may stop working in future versions of macOS. You must follow instructions give below. UPDATE: 5th June, 2023: macOS Sonoma has dropped support for Mail Plugins and there is no known workaround. Mail activity support in BusyContacts will be dropped for macOS Sonoma and above (i.e. macOS 14.0+). MailMate (3rd party app) is still supported.
- Messages — NO SUPPORT. Apple has disabled support for Messages in macOS 10.15 for 3rd party apps and above. This is no longer supported.
- Twitter — A list of recent Tweets by the selected contact.
Filtering Activities
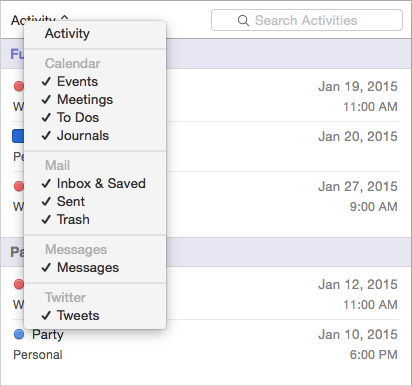
By default, all activities are shown. If you wish to hide some activity types to reduce clutter, click on the Activity Menu and uncheck the item types to exclude.
For example, you can uncheck the Sent and Trash checkoxes to show fewer Mail messages.
You can temporarily show or hide a section by clicking the Show/Hide link.

Interacting with items in the Activity List
You can perform the following actions in the Activity List:
- Double-click on an item to open it.
- Hover over an item to see more info in a tooltip.
- Select an item and press the space bar to preview it in Quick Look.
- Control-click on an item to display a contextual menu for that item or section.
- Click a To Do's checkbox to complete/uncomplete it.
- Click Show More to show 10 more items (Option-Click or Command-Click to show 100 more).
Searching the Activity List
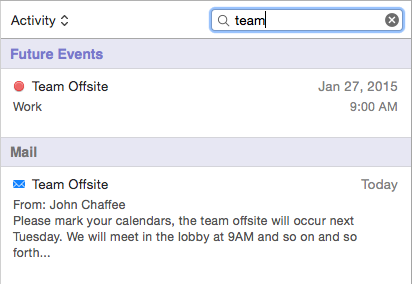
You can search the Activity List to show only activities that match a text string.
In the example below, a search for "team" reveals two matching items, one calendar event and one message.
Enabling Mail Activity on macOS 10.15 and above
Important: macOS Sonoma does not support Mail Activity
By default, macOS 10.15 Catalina and above have disabled access to mail for 3rd party apps. BusyContacts has now added support for fetching mail activity via an Apple Mail Plugin. This currently only works for Apple Mail and does not support 3rd party mail clients. Since it uses undocumented APIs, Apple may one day break this functionality altogether in future versions of macOS. If you use some other mail client such as Outlook, you may wish to checkout MailMate as explained here.
In order to make this work, please follow these instructions:
Make sure you have BusyContacts v2022.3.1 (or above).
Once installed, launch BusyContacts Settings, click on General. From there, click on "Install Apple Mail Plug-in". This will launch the Mail Plugin installer.
After the plugin has been installed, you must separately enable the plugin under Apple Mail. Here's how:
- Launch Apple Mail and select Settings… from the Mail menu
- Select the General tab
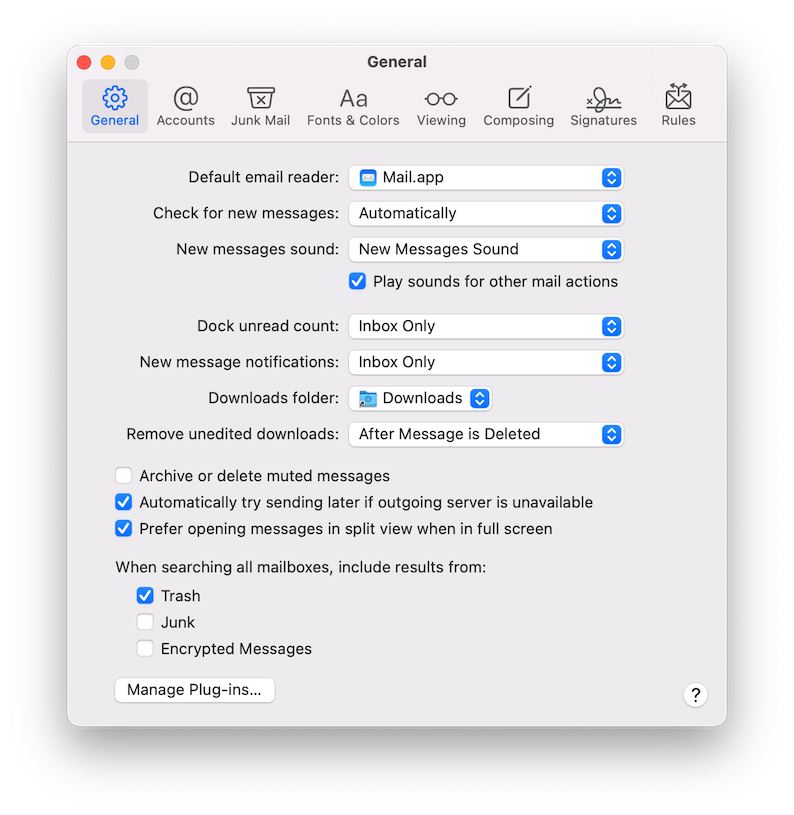
- Click the Manage Plug-ins… button (if you cannot see this button, please scroll down to the Troubleshooting section).
- Make sure that the BusyContactsMailPlugin checkbox is ticked
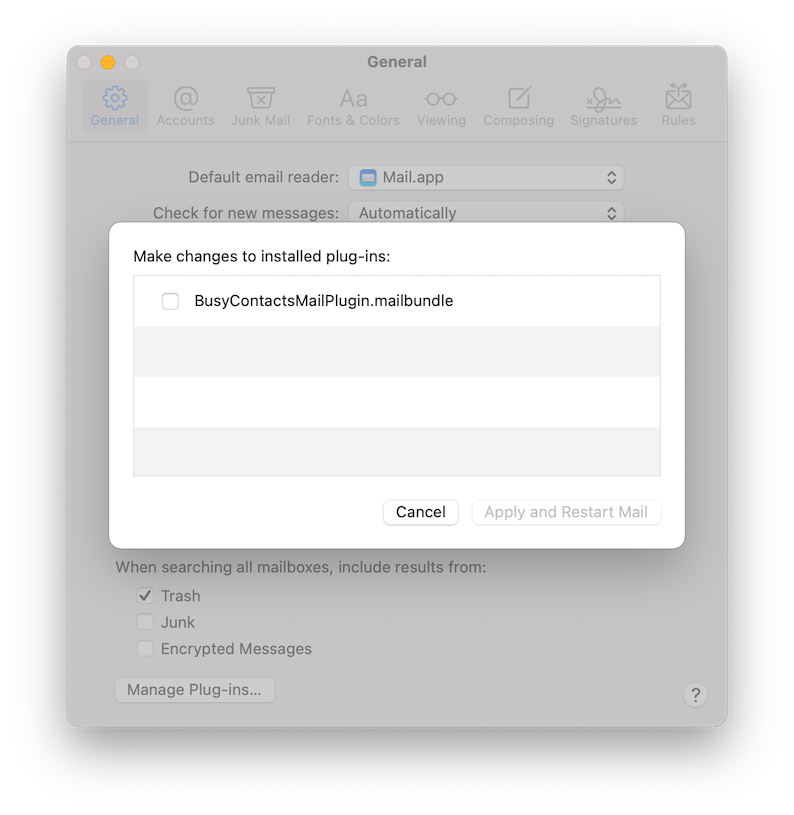
- Click on Allow access when prompted
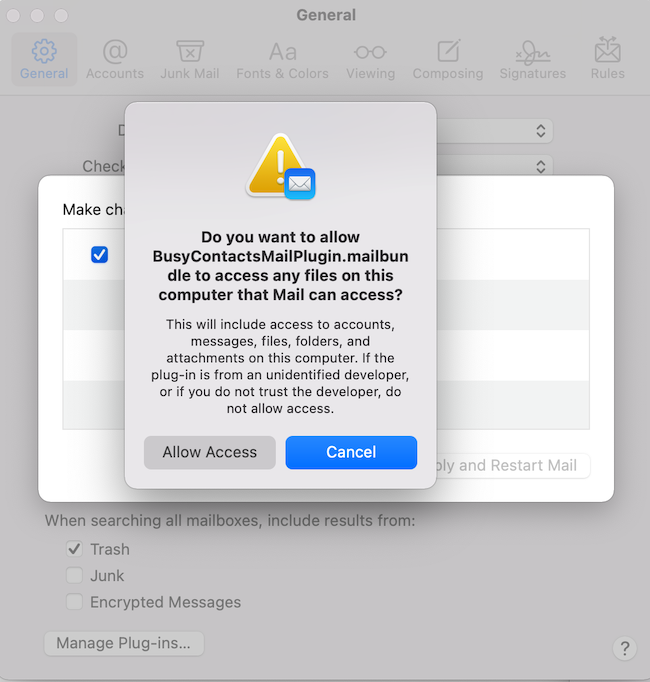
- Quit and relaunch Apple Mail
- Quit and relaunch BusyContacts
The first time you relaunch Apple Mail, you may be presented with a prompt requesting permission to access the Mail folder. This is required for the plugin to work. Please click Allow and then OK on the Open Dialog.
Mail activity should now be visible for the selected contact.
Uninstalling the Mail Plugin
If you wish to later uninstall the plugin for whatever reason, you will need to perform the following steps:
- Open BusyContacts > Settings. Click on "Updates".
- Click on "Uninstall Apple Mail Plug-in". This will launch an uninstaller to uninstall the plugin.
- Quit and relaunch Apple Mail
Troubleshooting
For mail to appear in the activity list, the BusyContacts Mail plug-in needs to be installed and activated and Apple Mail needs to be running in the foreground.
After you install the BusyContacts Mail Plugin, you must quit and relaunch Apple Mail for it to be able to refresh its plugin list.
Manage Plug-ins button missing from Apple Mail
In order to activate the BusyContact's mail plugin, you need to open Apple Mail > Settings > General and enable it from the menu that appears after you click "Manage Plug-ins...". This button may not appear at times. To fix this:
- Quit Mail
- Open Terminal.app and type the following two commands one after another (hitting return after each):
sudo -u root defaults write "/Library/Preferences/com.apple.mail" EnableBundles -bool true
defaults write com.apple.mail EnableBundles -bool true
- Relaunch mail and check Settings > General again. The "Manage Plugins" button should appear near the bottom of the window.
- Click on the Manage Plugins button, make sure "BusyContacts Mail Plugin" is checked, allow access when prompted and relaunch mail.
Mail Plugin not visible in Manage Plugins list
If you cannot see the plugin listed under Mail > Settings > General > Manage Plugins, then this may mean Mail's data vault is locked up. The symptoms of the locked up data vault are:
- New plug-ins do not appear in the list
- Mail keeps running old versions from the vault even after you install a newer one
Please follow instructions given in the following section for your version of macOS, as the same apply when the data vault has locked up.
Mail hung at launch
Mail may take a good few minutes at times to relaunch after installing a new plugin. A reboot may help. If all fails, you may wish to delete the plugin from under /Library/Mail/Bundles, allow Mail to launch again and then re-install the plugin.
Mail Plugin Incompatible Error
If you see a message such as BusyContacts Mail Plugin is not compatible... (this can happen if Apple changes something during a system upgrade), the plug-in is de-activated and will cease to work.
Solution: Please check that you have the current version of BusyContacts (v1.6 and above). Try re-installing the Mail plugin from BusyContacts > Settings > General > "Uninstall Apple Mail Plugin", and then "Install Apple Mail Plugin".
Should Mail still report a compatibility issue, it is probably running an older copy of the plug-in rather than using the freshly installed one. Please read on.
BusyContacts installs the BusyContactsMailPlugin.mailbundle in /Library/Mail/Bundles for all users. This is also where Mail takes you when you ask it to show the plug-in in Finder.
Next, Apple Mail should copy the plugin to its Data Vault folder. This is how Mail checks if plug-ins have been updated: it compares the installed version to the one in the DataVault. When it detects a difference it again asks for your permission to run the new version.
Sometimes the Data Vault can lock up. When that happens, you can no longer enable or disable installed plug-ins. Mail will keep running the plug-ins it has in the vault and ignore plug-ins and updates installed in /Library/Mail/Bundles
To fix this, the following should help. Warning: Diagnosing and fixing this is a complex process.
macOS 11.0 Big Sur
The main plugin installs in this location:
/System/Volumes/Data/MailBundles/Library/Mail/Bundles/BusyContactsMailPlugin.mailbundle
Try copying this bundle into the following location on disk, replacing USERNAME with your username:
~/Library/Application Support/Mail/Plug-ins/Bundles/Users/USERNAME/Library/Mail/Bundles/BusyContactsMailPlugin.mailbundle
If that fails, note that on macOS Big Sur, the Data Vault is at ~/Library/Application Support/Mail/Plug-ins/Bundles within your home folder. Try deleting that folder.
- Quit the Apple Mail application
- In Finder, hold the Option/Alt key as you click the Go menu
- Select Library from the Go menu
- From your Library folder navigate to ~/Library/Application Support/Mail/Plug-ins/
- Remove the ~/Library/Application Support/Mail/Plug-ins/Bundles folder (*)
- You may also find that on your mac it's installed under. You should remove its contents as well: ~/Library/Application Support/Mail/Plug-ins/Bundles/Library/Mail/Bundles/
- Open Apple Mail
- In Mail > Settings > General > Manage Plug-ins… enable the plug-ins you want to use
(*) Should macOS not let you delete the folder, you will need to temporarily turn off System Integrity Protection (SIP) so that you get permission to delete the protected Bundles folder.
- You may want to print these instructions or open them on a second device
- Click on the Apple menu and choose Restart…
- Hold down the Command and R keys so that your Mac will reboot in Recovery Mode
- From the Utilities menu at the top of the screen, choose Terminal
- Type (without the quotes): "csrutil disable"
- and press Return. This command turns off SIP
- Click on the Apple menu and choose Restart…
- Drag the ~/Library/Application Support/Mail/Plug-ins/Bundles folder to the Trash
- Repeat steps 2. - 7. typing "csrutil enable" instead to turn SIP back on
macOS 10.15 Catalina
The Mail application should be able to reset its DataVaults folder:
- Quit the Apple Mail application
- Open the Terminal app from the /Applications/Utilities folder
- Paste in this command (without the quotes): "defaults delete com.apple.mail EnableBundles"
- and press Return
- Open the Apple Mail application and quit it again
- Paste in this command (without the quotes): "defaults write com.apple.mail EnableBundles -bool YES"
- and press Return
- Open the Apple Mail application
- In Mail > Settings > General > Manage Plug-ins… enable the plug-ins you want to use
If asking Mail to reset the folder DOES NOT work, you need to delete the DataVaults folder manually. Mail will recreate it once you enable a new plug-in. You will need to temporarily turn off System Integrity Protection (SIP) so that you get permission to delete the protected DataVaults folder.
- You may want to print these instructions or open them on a second device
- Click on the Apple menu and choose Restart…
- Hold down the Command and R keys so that your Mac will reboot in Recovery Mode
- From the Utilities menu at the top of the screen, choose Terminal
- Type (without the quotes): "csrutil disable"
- and press Return. This command turns off SIP
- Click on the Apple menu and choose Restart…
- In Finder, hold the Option/Alt key as you click the Go menu
- Select Library from the Go menu
- From your Library folder navigate to ~/Library/Containers/com.apple.mail/Data
- Drag the ~/Library/Containers/com.apple.mail/Data/DataVaults/ folder to the Trash
- Open the Apple Mail application
- In Mail > Settings > General > Manage Plug-ins… enable the plug-ins you want to use
- Repeat steps 2. - 7. typing "csrutil enable" instead to turn SIP back on